Hello friends,
Today I will explain you how to use GCM(Google Cloud Messaging) service which is provided by Google. Google Cloud Messaging for Android (GCM) is a service which allows you to send data from your server to your users’ Android-device. This could be a lightweight message telling your app there is new data to be fetched from the server, or it could be a message containing up to 4kb of payload data. This is very helpful if you want to send instant notification to your User after some event(action).
The GCM service handles all aspects of queueing of messages and delivery to the target Android application running on the target device. GCM is completely free no matter how big your messaging needs are. For using this service ,you need to register to google for getting API key .
Follow the below steps to register.
1) Open Google API Registration Page
2) If you haven’t created an API project yet, this page will prompt you to do so:

3) Click Create project. Your browser URL will change to something like:
4) Note Down the value after #project: (4815162342 in this example). This is your project number, and it will be used later on in your android code as the GCM sender ID.
Getting API KEY
- In the main Google APIs Console page, select API Access. You will see a screen following screen:
 2) Click Create new Server key. Either a server key or a browser key should work. The advantage to using a server key is that it allows you to whitelist IP addressesAfter that click on Create button which will display following screen:
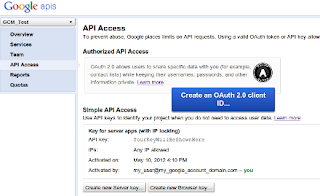 API key value (
YourKeyWillBeShownHere) in this example, as it will be used later on.Now,How to use this API key in Android??.For that you have to do some configuaration.See the following steps..1) From the SDK Manager, install Extras > Google Cloud Messaging for Android Library.After Installing go to the path: YOUR_SDK_ROOT\extras\google\gcm\gcm-client\distMy path is: C:\Users\MYPC\android-sdks\extras\google\gcm\gcm-client\dist2) From this folder copy the JAR file gcm.jar to your application’s classpath.Remember one thing GCM requires Android 2.2 or later3) Declare and use a custom permission in your application’s Manifest file so only this application can receive GCM messages:<permission android:name="my_app_package.permission.C2D_MESSAGE" android:protectionLevel="signature" /> <uses-permission android:name="my_app_package.permission.C2D_MESSAGE" />
4) Add the following Permissions in Manifest file:!-- App receives GCM messages. --><uses-permission android:name="com.google.android.c2dm.permission.RECEIVE" /><!-- GCM connects to Google Services. --><uses-permission android:name="android.permission.INTERNET" /><!-- GCM requires a Google account. --><uses-permission android:name="android.permission.GET_ACCOUNTS" /><!-- Keeps the processor from sleeping when a message is received. --><uses-permission android:name="android.permission.WAKE_LOCK" />5) Add the following broadcast receiver in Manifest file:<receiver android:name="com.google.android.gcm.GCMBroadcastReceiver" android:permission="com.google.android.c2dm.permission.SEND" ><intent-filter><action android:name="com.google.android.c2dm.intent.RECEIVE" /><action android:name="com.google.android.c2dm.intent.REGISTRATION" /><category android:name="my_app_package" /></intent-filter></receiver>Atlast One Important thing,For using or testing your App in Emulator you need to test it on Google API device only.For that you have to create Emulator with Google API.Second thing you need to create or sign In with your google account in Emulator.For that,After launching emulator press Menu button goto Settings. Select Accounts & Sync. And then press Add Account button and add a Google accountThat’s it.After following above steps you can able to use GCM in your android application.Hope it helps.Thanks.


0 comments:
Post a Comment